Get Started with DBOS
DBOS is a library for building reliable programs. This guide shows you how to install and run it on your computer.
- Python
- TypeScript
- Go
- Java
1. Create a Virtual Environment
Create and activate a Python virtual environment in a directory. DBOS requires Python 3.9 or later.
- macOS or Linux
- Windows (PowerShell)
- Windows (cmd)
python3 -m venv dbos-app-starter/.venv
cd dbos-app-starter
source .venv/bin/activate
python3 -m venv dbos-app-starter/.venv
cd dbos-app-starter
.venv\Scripts\activate.ps1
python3 -m venv dbos-app-starter/.venv
cd dbos-app-starter
.venv\Scripts\activate.bat
2. Install and Initialize DBOS
Install DBOS and FastAPI (used by the example application). Then initialize an example application.
pip install dbos 'fastapi[standard]'
dbos init --template dbos-app-starter
3. Start Your App
Now, start your app!
python3 app/main.py
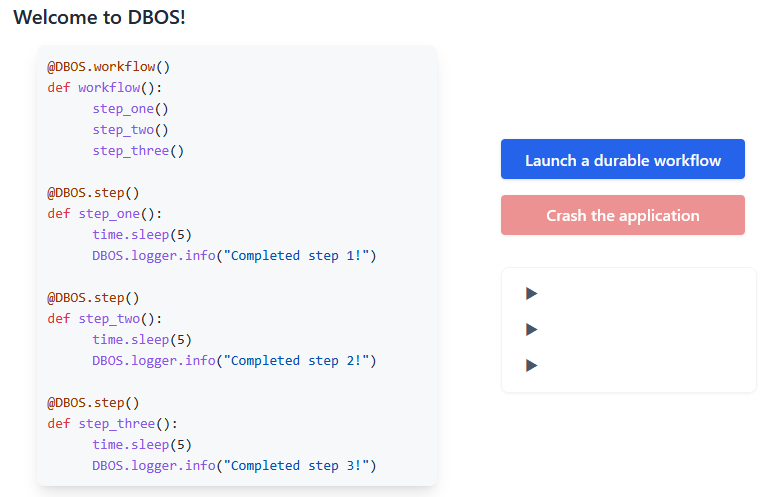
To see that your app is working, visit this URL in your browser: http://localhost:8000/
This app lets you test the reliability of DBOS for yourself.
Launch a durable workflow and watch it execute its three steps.
At any point, crash the app.
Then, restart it with python3 app/main.py and watch it seamlessly recover from where it left off.
Congratulations, you've run your first durable workflow with DBOS!
4. Connect to DBOS Conductor
Conductor is the control plane for your durable workflows, providing distributed workflow recovery, observability, and management.
To connect your app to Conductor, first register it on the DBOS console using the name dbos-app-starter, then generate an API key from the key settings page.
Provide your API key to your app through the DBOS_CONDUCTOR_KEY environment variable, then restart it to connect it to Conductor.
export DBOS_CONDUCTOR_KEY=<your-api-key>
python3 app/main.py
Your app is now connected to Conductor! You can view and manage its workflows from the DBOS console.
Next:
- Check out the DBOS programming guide to learn how to build reliable applications with DBOS.
- Learn how to add DBOS to your application to make it reliable with just a few lines of code.
1. Initialize an Application
Initalize a starter application and enter its directory. DBOS requires Node v20 or later.
npx @dbos-inc/create@latest --template dbos-node-starter
cd dbos-node-starter
2. Build Your Application
Install dependencies, then build your application.
npm install
npm run build
3. Start Your App
DBOS requires a Postgres database.
If you already have Postgres, you can set the DBOS_SYSTEM_DATABASE_URL environment variable to your connection string.
Otherwise, you can start Postgres in a Docker container with this command:
npx dbos postgres start
Now, start your app!
npm run start
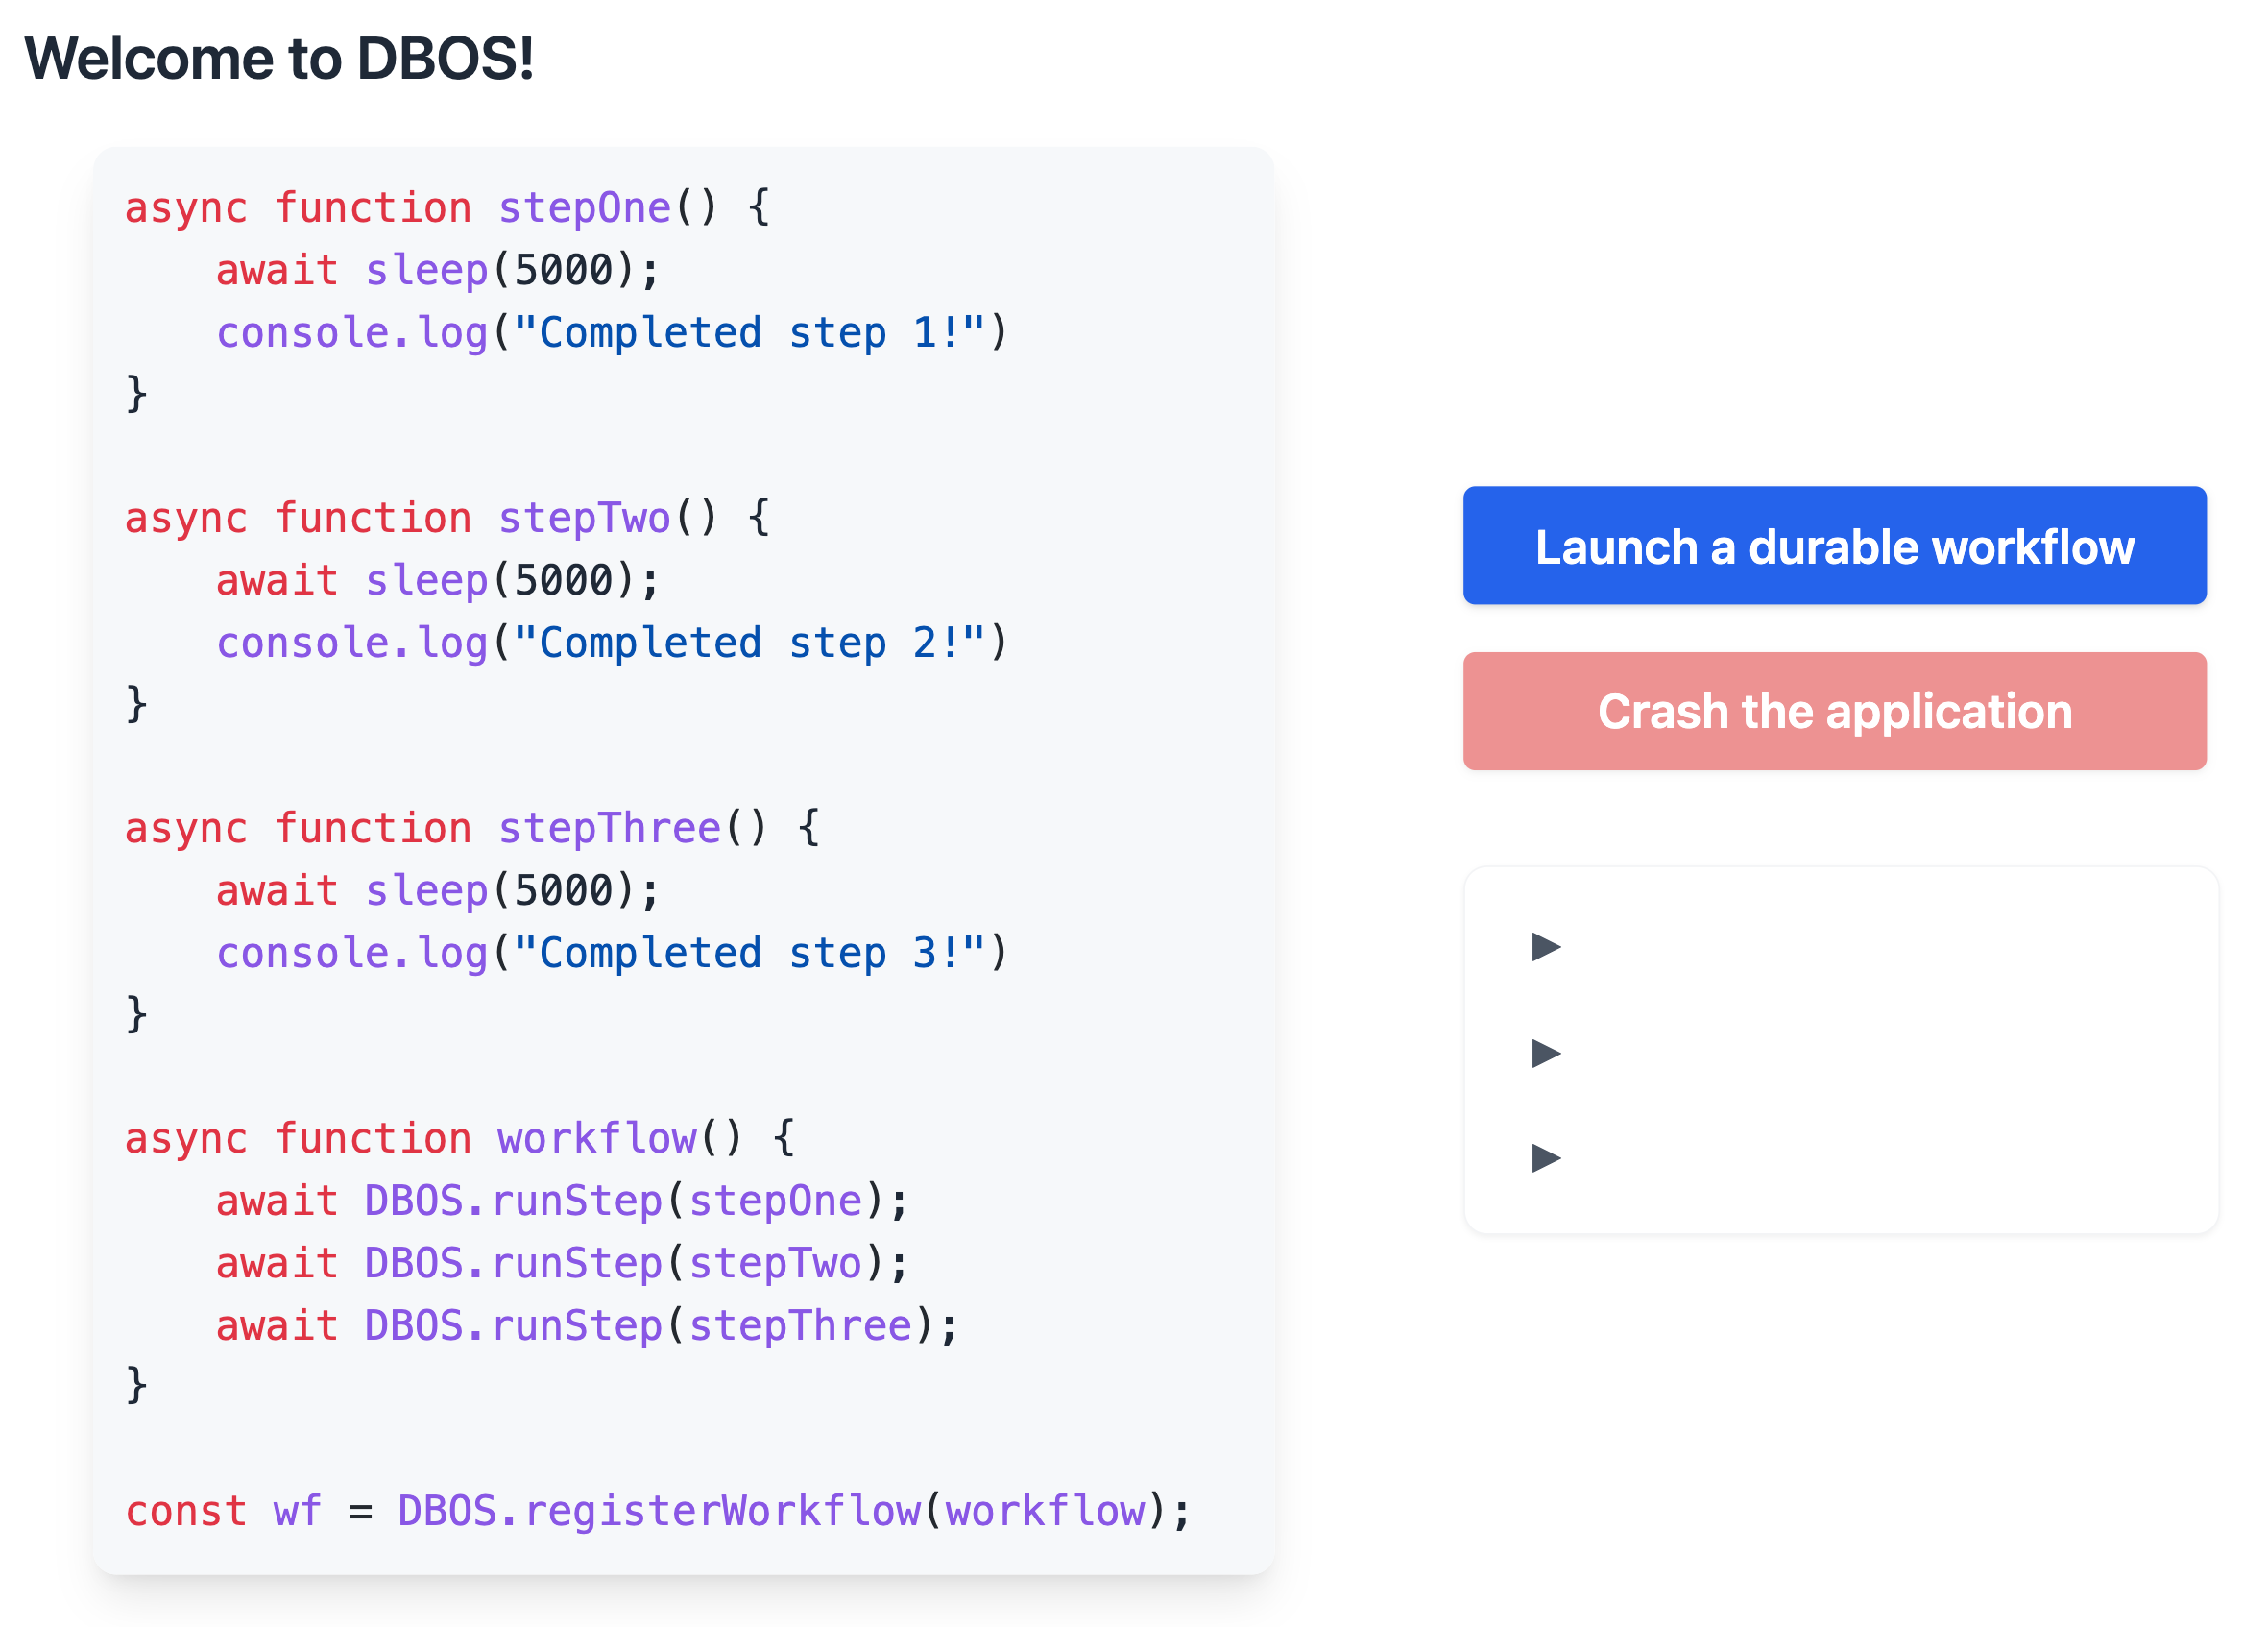
To see that your app is working, visit this URL in your browser: http://localhost:3000/
This app lets you test the reliability of DBOS for yourself.
Launch a durable workflow and watch it execute its three steps.
At any point, crash the app.
Then, restart it with npm run start and watch it seamlessly recover from where it left off.
Congratulations, you've run your first durable workflow with DBOS!
4. Connect to DBOS Conductor
Conductor is the control plane for your durable workflows, providing distributed workflow recovery, observability, and management.
To connect your app to Conductor, first register it on the DBOS console using the name dbos-node-starter, then generate an API key from the key settings page.
Provide your API key to your app through the DBOS_CONDUCTOR_KEY environment variable, then restart it to connect it to Conductor.
export DBOS_CONDUCTOR_KEY=<your-api-key>
npm run start
Your app is now connected to Conductor! You can view and manage its workflows from the DBOS console.
Next:
- Check out the DBOS programming guide to learn how to build reliable applications with DBOS.
- Learn how to add DBOS to your application to make it reliable with just a few lines of code.
1. Initialize an Application
Install the DBOS Go CLI, then initialize a starter application and enter its directory. DBOS requires Go 1.23.0 or higher.
go install github.com/dbos-inc/dbos-transact-golang/cmd/dbos@latest
dbos init
cd dbos-toolbox
2. Launch Postgres
DBOS requires a Postgres database.
If you already have Postgres, you can set the DBOS_SYSTEM_DATABASE_URL environment variable to your connection string.
Otherwise, you can start Postgres in a Docker container with this command:
dbos postgres start
export DBOS_SYSTEM_DATABASE_URL=postgres://postgres:dbos@localhost:5432/dbos_toolbox_go
3. Start Your App
Now, download dependencies and start your app!
go mod tidy
go run main.go
To see that your app is working, visit this URL in your browser: http://localhost:8080/
Congratulations, you've run your first durable workflow with DBOS!
4. Connect to DBOS Conductor
Conductor is the control plane for your durable workflows, providing distributed workflow recovery, observability, and management.
To connect your app to Conductor, first register it on the DBOS console using the name dbos-toolbox, then generate an API key from the key settings page.
Provide your API key to your app through the DBOS_CONDUCTOR_KEY environment variable, then restart it to connect it to Conductor.
export DBOS_CONDUCTOR_KEY=<your-api-key>
go run main.go
Your app is now connected to Conductor! You can view and manage its workflows from the DBOS console.
Next:
- Check out the DBOS programming guide to learn how to build reliable applications with DBOS.
- Learn how to add DBOS to your application to make it reliable with just a few lines of code.
1. Download an Application
Download an example application and enter its directory. DBOS requires Java 17 or higher.
git clone https://github.com/dbos-inc/dbos-demo-apps.git
cd dbos-demo-apps/java/dbos-starter
2. Launch Postgres
DBOS requires a Postgres database.
If you already have Postgres, you can set the DBOS_SYSTEM_JDBC_URL environment variable to your connection string.
Otherwise, you can start Postgres in a Docker container and set environment variables with these commands:
docker run -d --name dbos-postgres -e POSTGRES_PASSWORD=dbos -p 5432:5432 postgres:17
export PGUSER=postgres
export PGPASSWORD=dbos
export DBOS_SYSTEM_JDBC_URL=jdbc:postgresql://localhost:5432/dbos_java_starter
3. Start Your App
Now, start your app!
./gradlew run
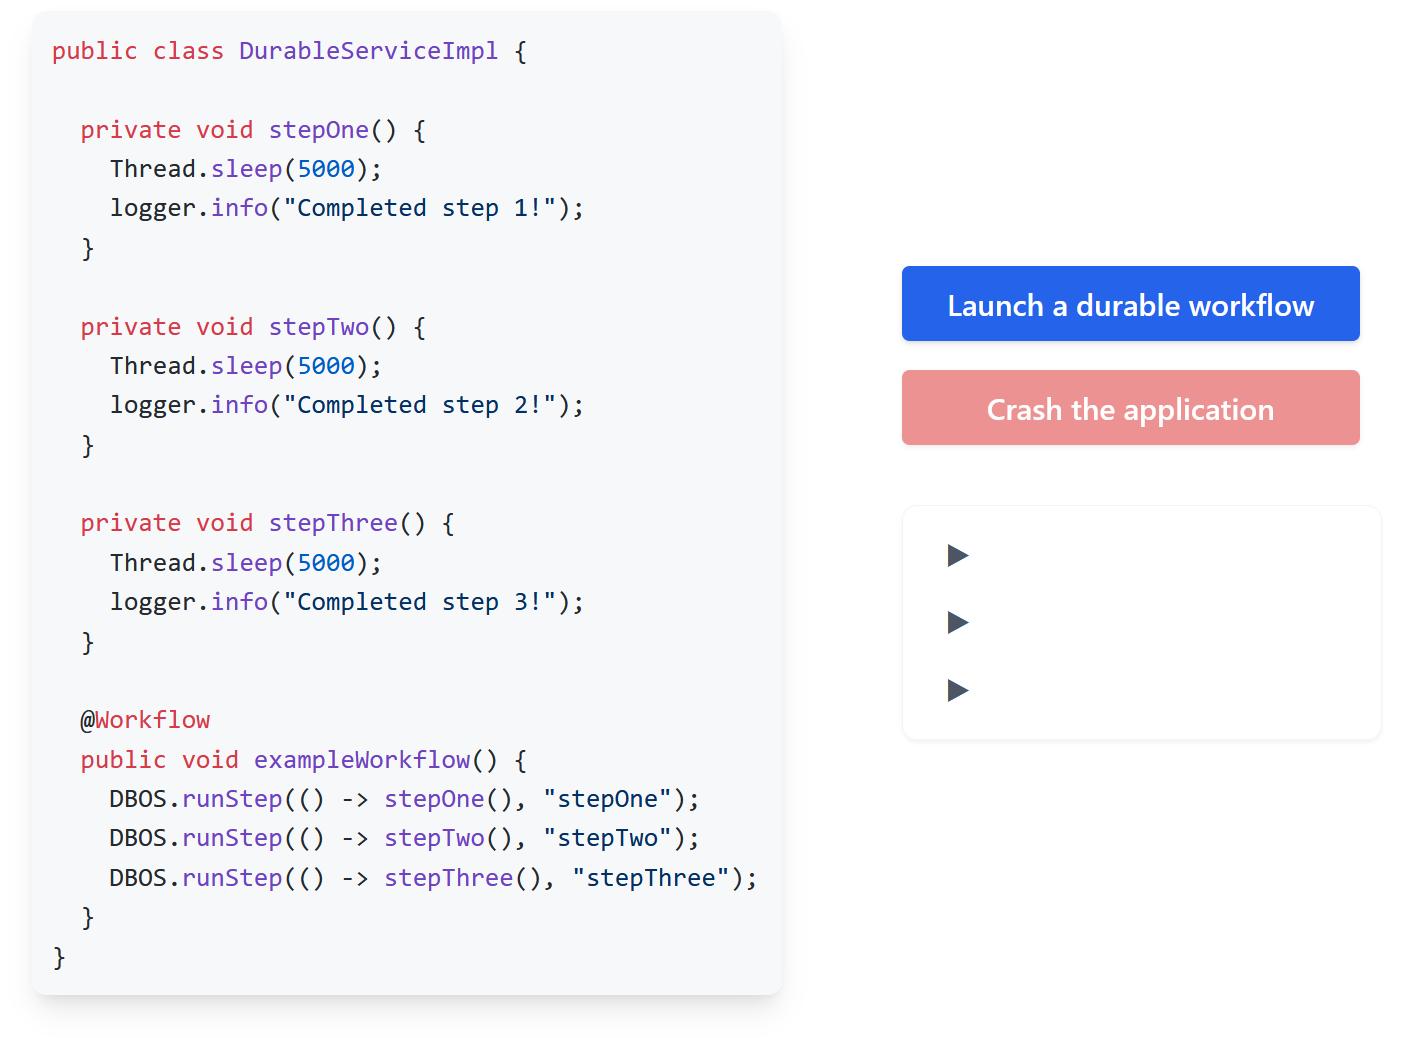
To see that your app is working, visit this URL in your browser: http://localhost:7070/
This app lets you test the reliability of DBOS for yourself.
Launch a durable workflow and watch it execute its three steps.
At any point, crash the app.
Then, restart it with ./gradlew run and watch it seamlessly recover from where it left off.
Congratulations, you've run your first durable workflow with DBOS!
4. Connect to DBOS Conductor
Conductor is the control plane for your durable workflows, providing distributed workflow recovery, observability, and management.
To connect your app to Conductor, first register it on the DBOS console using the name dbos-starter-java, then generate an API key from the key settings page.
Provide your API key to your app through the DBOS_CONDUCTOR_KEY environment variable, then restart it to connect it to Conductor.
export DBOS_CONDUCTOR_KEY=<your-api-key>
./gradlew run
Your app is now connected to Conductor! You can view and manage its workflows from the DBOS console.
Next:
- Check out the DBOS programming guide to learn how to build reliable applications with DBOS.
- Learn how to add DBOS to your application to make it reliable with just a few lines of code.